Setting up Billing Codes
The Billing Codes table is central to the operation of the job costing system in Studio Manager. It specifies how each billing item is handled. Every estimated item, purchase order, payable, chunk of time or supplier invoice that is entered into Studio Manager must be assigned a valid billing code.
Opening Billing Codes

From the PLACES menu on an entry screen, select “More Places”. This opens a small modale window that lists the tables not shown in the shorter view. Click once on the Billing Codes button to open the table.
How Billing Codes are Used
A Billing Code is a short string of characters that represents a billable activity or type of expense.
Billing codes might be assigned for services such as: design, production, research, project management, administration, etc.. Billing codes representing expenses might include color copies, media, film, deliveries, photography, printing, long distance phone calls and trip expenses such as airfare and lodging.
By classifying each time and expense entry by billing code, Studio Manager can generate reports that summarize job time and expenses by category, showing you exactly where the time and money went. This will improve your estimating as well as help you see where you stand vis a vis your budget while jobs are in progress.
Billing codes are an integral part of the data entered whenever you build an estimate, create a purchase order, use Timesheets, enter expenses directly into Job Costs or do invoicing. THEREFORE billing codes must exist BEFORE you begin entering any data that records time or expenses.
Sample Billing Codes
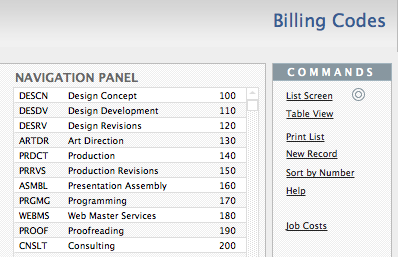
The billing codes that come with Studio Manager are samples – a place to start. You can use them exactly as provided, change them, delete them and/or add new ones that work better for you. The NAVIGATION PANEL shows a scrolling list of each blling code. Click on a line in the Navigation Panel for immediate access to the full record for that code.
Getting your billing codes in order is a critical part of setting up Studio Manager (see Billing Code Numbers below).
Deciding on Billing Codes
First make a comprehensive list (some suggestions are already included) of the service and expense codes you need. “Other†is not a good one. If you think about it, you will be able to come up with codes that are general enough to cover just about anything without having to resort to codes like “Miscellaneous Service†and “Unspecified Expense.†If you feel the need, you can create codes like these, just realize that time and expenses lumped into these categories have very little meaning — make sure you only use them for exceptional or unusual situations.
Create a billing code for every billing category you need to track. Don’t go overboard – a shorter list will be easier for you and your staff to deal with. As with so much in life, less is more.
Make billing codes memorable and brief. We have suggested the billing code “DESCN†for Design Concept and “PRINT†for Printing. Whatever codes you use, we strongly recommend that each code use the same exact number of characters used for every code. Four to six-letter codes seem to work the best.* The system also works with shorter codes, numeric codes or alphanumeric codes, whatever works for you, up to six characters.
If you do not use the same number of characters for each code, the Value Lists in other tables from which you choose billing codes will be jumbled-looking and hard to read.
Billing Code Numbers
Each billing code record contains a unique number that determines the order in which they sort. You can adjust the Billing Code Number so that your codes appear in the sequence you want on estimates, invoices and reports. Without numbers to sort by, they would just appear in alphabetical order.
When you first define the billing codes you want, use increments of ten between the numbers to leave room so that later you can insert additional billing codes that you forgot or didn’t know that you would ever need.
NOTE: you can “insert†billing codes where you want in the list by assigning them the appropriate number. For example, you might want a new category Account Management to go after Consulting which is number 200 and before Project Management which is 210. Add a new record for Account Management, give it the billing code number 205 and then click the Sort by Number button.
Renumbering Billing Codes
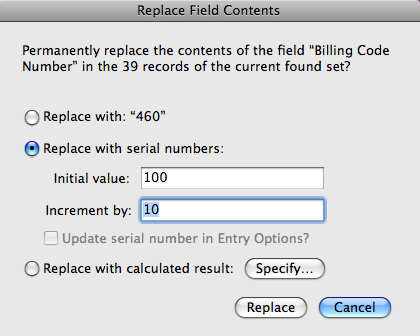
When you are done setting up your codes, you can restore them to an evenly numbered order by first sorting by number and then using the “Replace†command to “Replace with Serial Numbersâ€.
From the Records menu select “Show All Records”. Sort by Number, then click into the Billing Code No. field on the first record to select it. From the Records menu, choose “Replace Field Contents.” Set the Initial Value to 100 and increment by 10.
Warning: don’t try this trick after you’ve already started using billing codes in Timesheets and in entering expenses. If you do, you will have to re-code all existing time and expense entries to match your new scheme.
Categories
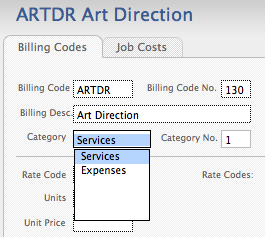
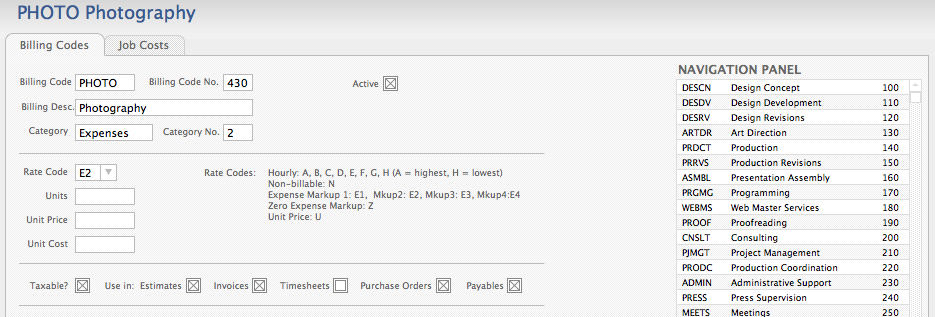
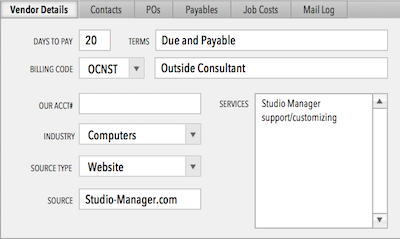
Each billing code must be categorized as “Services†for services delivered (labor, work, time performed by the hour), or “Expenses†for both in-house and outside expenses associated with a job. Select the appropriate choice from the pop-down list. The Category No. is assigned automatically.
Rate Codes
Each billing code must have a rate code. Studio Manager is configured to accommodate rate codes that will accommodate the various ways you charge for services and expenses. Below we go through each of these.
How many hourly rates do you need?
Eight hourly rates have been built into Studio Manager: Rate Code “A” through “H.” It is up to you to decide what each rate represents. If you use 4 rates, you could set Rate A as the highest rate, for consulting maybe, then Rate “B” for design (if that’s billed at a lower amount), Rate “C” for production and Rate “D” for administration.
You don’t have to use all eight rates. Probably the most common scheme is two rates: a design rate and a lower production rate. Some top firms use one rate for everyone, figuring it all averages out in the end. That simplifies their billing lives a lot.
Hourly Rate Codes

Hourly Rates: A, B, C, D, E, F, G, H (where you assign meaning to each code like “A” for your top rate, “B” for the next lower rate and so on) and “N” = Non-billable.
By using rate code “N” for pro bono jobs, and those you do for your own in-house use, is that you can treat these jobs like normal ones and still keep track of the hours used.
Most of our customers use four or fewer hourly rate codes for simplicity. An advantage of using more rate codes (rather than fewer) is that you can be very specific in the way that you charge for your time. This is much more common in large firms.
How many markup rates do you need?
Decide how many markup rates you need for expenses. Most firms use one markup rate. The most typical markup is probably 20%, but small firms often charge 15% or 17.65%. Studio Manager allows for four markup rates to accommodate big ticket categories like printing or photography, where you might want to charge differently. Some firms markup all expenses and others make exceptions for things like long distance phone calls, deliveries and postage.
Expense Markup Rates
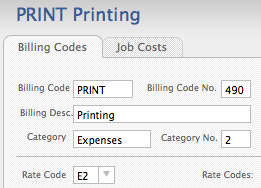
Expense Markup Rates: E1, E2, E3, E4 = Markup Rate1, Markup Rate2, etc.
When entering the markup rates, be sure to use decimal amounts. For example, enter .20 (not 20 or 1.2) for 20% markup. Enter .1765 for 17.65%.
Expenses by the Unit
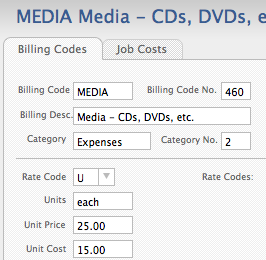
“U” = Unit Price (For when you charge per unit. For example, you might have a unit price for travel mileage like 50¢/mile; 10¢/copy for copies and laser prints, or 15.00 each for DVDs.)
Units. This field describes the unit of measure. Examples of units might be each, miles, pages, copies, etc.
Unit Price & Unit Cost. If you bill for any expenses by the unit or quantity used, specify a unit price and a unit cost. Typical expenses that might be billed on a unit basis are: media (like DVDs), mileage, copies, laser prints, color prints, etc.
Say you charge for black and white laser prints at 10¢ per print. If so, set the unit price for laser prints at “.10.†The unit cost is what you pay + overhead, i.e. your cost for an expense item that you bill by the unit. If you bill laser prints at 10¢ per print, but you think it only costs you 4.5¢ per print, then set the unit cost for laser prints at “.045â€.
Can I charge by the unit and apply a markup rate?
Each billing code is limited to a single rate code. If you sometimes charge for an item by a fixed amount and sometimes by a unit price calculation, then you will need to create two separate billing codes, one with a markup rate code and one with the rate code “U” for units.
Zero Markup
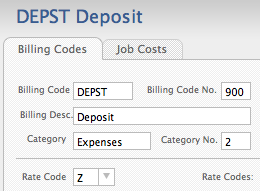
“Z” = Zero Markup. The billing codes for Deposit and Sub-job are never marked up and so use Rate Code “Z.”
Required Billing Codes
There are four records in Billing Codes that we strongly recommend that you neither delete nor modify. Only one of these is for services: “CRFEE†or Creative Fee is used automatically when you enter an amount into Input Hrs for a flat fee or summary estimate. “EXPNS†is short for Expenses and is similar in that it is used when you type a figure into the Input Cost field for a summary estimate. These codes are used by Studio Manager when you elect to create a Summary Estimate.
If you are choosing to use codes that are not 5 characters each (like our samples) then you may want to modify these codes. WARNING: If you do so, you are also going to need to modify an invoicing script that is hard-wired to look for these codes.
There are two other Billing Code records that you will always keep. One is “DEPST†or Deposit. This code is used during invoicing when you enter a deposit. The other code, “SBJOB†or Sub-job, is used by estimates and invoices for component jobs.
Personalize Studio Manager

Enter the appropriate data for your company, replacing the placeholder text. If you are a client on a network with FileMaker Server, click on the warning for additional help. Follow the instructions there that require you to perform personalization from Studio Manager on the server but while using a copy of FileMaker Pro or Advanced. This is done to make the personalization permanent for everyone.
Entering Default Rates

Before you begin entering any time or expenses, you must set up default billing rates. From any record in Billing Codes, choose the Rates subtab. These are the rates that will be used unless you change them in Contacts or Jobs for specific customers or projects.
The label for a default estimate rate should be self-explanatory. It serves as a catch-all services rate when you just want to specify a total number of hours (on a Flat Fee estimate) rather than estimating in detail. It is worth noting, that you can estimate a project in detail (for internal use) but then just show the client a flat fee (because that’s what they requested).
Setting SM Preferences

On the SM Prefs tab you set Studio Manager Preferences. You may want to read about the Average Cost per Hour (below) before deciding what to use. These preferences can be adjusted later as needed. They are essentially defaults, which means that they can usually be changed on the actual record that they affect.
There are a few places in Studio Manager where the FileMaker Pro system preference for the date format are not used. Setting the format here fixes those reports. The default year is used for creating some reports. If you notice that a previous year seems to auto-enter on a prompt, come back here to fix it.
Preference settings here, like alternate category names (perhaps you think of “services” as “fees”) and Invoice Terms are self-explanatory.
Defaults for Estimates
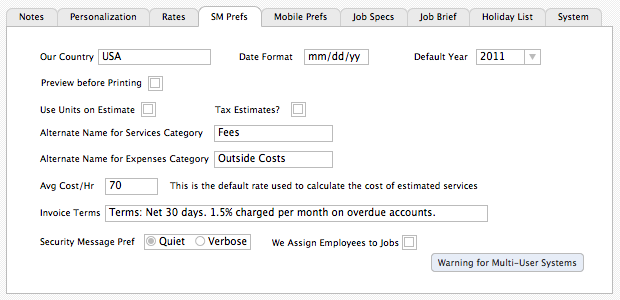
There is a default setting on the SM Prefs tab called “Use Units on Estimate.” If you want all of your printed estimates to show the units that were estimated (e.g. 5 @ 25 each), mark the checkbox to set the default. Then, each estimate that you create automatically defaults to printing the unit data. You can change it for any particular estimate, so only set the default (by checking the box) if you want the unit values to appear on most of the estimates that you print. HINT: This is acutally a rarely used option since a number of units is hard to estimate.
Another rarely used optional default is to show sales tax on an estimate. It may be uncommon, but we have had requests for this feature, so here it is.
Defining an Average Cost per Hour for Estimates

If you will be using Studio Manager for estimating, then enter an Avg Cost/Hr (average cost per hour). This is your average labor cost (what you pay). As with the rates, this default average can be changed for any particular estimate where you expect to use staff that have a higher or lower average cost. Doing so will allow you to track the cost of each estimated job.
For estimates, it would be too cumbersome to enter a cost rate for every service line item. So instead, we suggest that you define a figure that represents the average cost rate, for use as a default amount. If you have two staff cost rates, $80 for senior staff and $40 for junior staff, and your job-related work tends to split evenly between senior and junior employees, then the average cost rate for estimating purposes would be $60/hour.
You definitely want to do this if you decide to enter a Cost Rate for each billable staff member (see the lesson on setting up Contacts for more about this).
Mobile Prefs
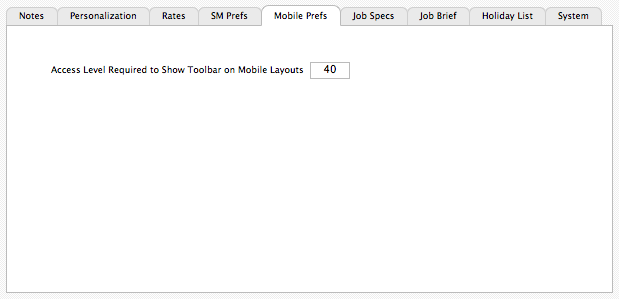
Mobile access to Studio Manager via FileMaker Go for iPad, iPhone and iPod touch is a recent addition. So far there is only one preference setting and that one has to do with security, something you may or may not know anything about. Suffice it to say that the default already specified will be sufficient for most users. Only modify this if you know the impact of changing this to allow greater (or less) access to the Show Toolbar feature on a mobile device.
Edit Default Job Specifications
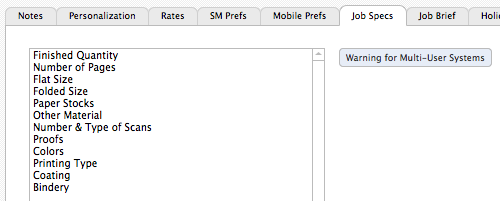
The job specs list is simply text with a return between each line. If you plan to use the Job Specs feature, then edit this list. Default specifications are typically those aspects of a job that are quantifiable. These are simply the defaults, so include all that you typically need in a logical order. When you use the default (while creating a job) you can edit them there.
Edit Job Brief Items
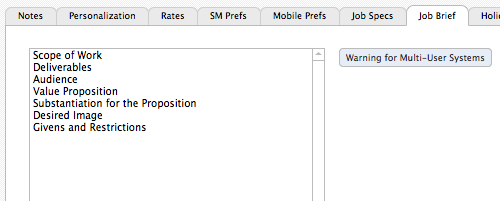
If you wish to use the Job Brief feature in Jobs, then edit or replace the entries in this text list. These variables describe the scope, intention and conditions that are philosophical rather than mechanical.
Holiday List

Studio Manager includes a feature that allows you to modify the schedule for a series of tasks for a particular job. This is extremely useful when your client temporarily halts a job or any other time you need to adjust many (or all) of the task due dates. Slip Task Due Date allows you to move a chunk of due dates all at once. Weekends are automatically skipped but holidays are another story. The only way that Studio Manager can advance (or regress) the due dates and take holidays into consideration is by referring to this list of holidays.
The list currently includes the standard federal holidays for the U.S. only (through 2013). You may modify this list to conform to the holidays that you recognize. These are the dates on which you know that your office will be closed. When adding dates, be sure to enter them in order and in the same format. You do not need to enter leading zeroes. WARNING: Do not enter 2 dates in a row even if you are taking off both days. Instead, just add a day to the number of days that you are pushing forward or reversing the due dates. This is a limitation of the custom function that was acquired to make this feature work.
System
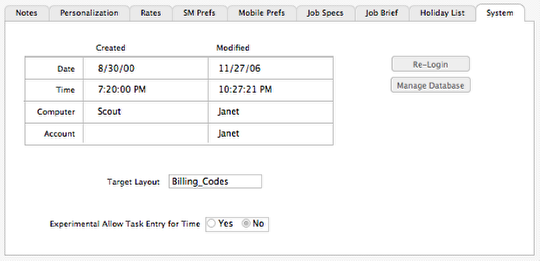
There are no fields to modify on the System tab. You want to know about this screen however. It contains the Audit fields for each record in Billing Codes. This is also where you find buttons that will allow you to Re-Login as a different user (than the one chosen at the Welcome screen). Master access is required to access Manage Database because that is something that should only be used by us, a qualified consultant or knowledgeable in-house person who is customizing Studio Manager.
This is also where the experimental preference is set if you are customizing your copy of Studio Manager so that time is tracked by task as well as by hour. There are a number of other changes that are required to permit this function, so please do NOT change this setting unless you are customizing for that particular feature.
{ 0 comments… add one now }
You must log in to post a comment.