Setting Up Jobs
Before you begin using Studio Manager, there are several things you need to know about how it works. In the management of a creative services business, tracking of estimates, time and expenses is organized by the job. Each job has a Job ID that Studio Manager uses to link the related tables to each other.
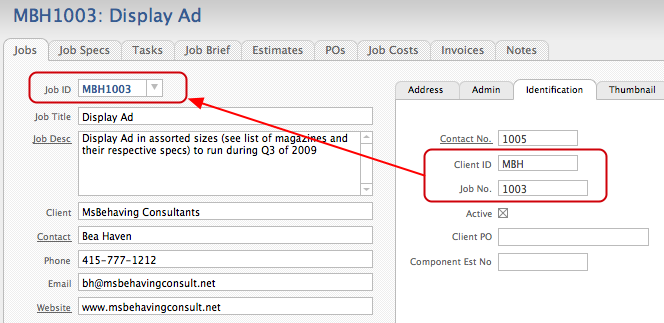
Job Numbers and Job ID
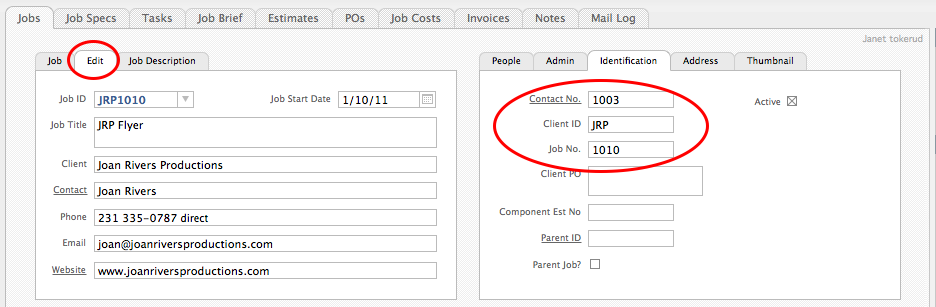
Because each job you work on must be assigned a unique identifying code, Studio Manager comes configured to enter a different Job Number each time you create a new job. The Job Number is used along with the Client ID to calculate the Job ID. To make data entry most efficient, Job numbers are set to auto-enter sequentially, so each time you create a new job it gets assigned the next sequential number.
Some design firms are accustomed to a job number or code that includes a short abbreviation for each client as the beginning of the job number. For example, ABC Inc. might have a client code of ABC, so all of its job numbers start with ABC. Job numbers for ABC might include: ABC1004, ABC1023 and ABC1039.
To accommodate this convention, the calculated field called Job ID automatically joins the Client ID with the Job Number. This full Job ID is displayed on estimates, invoices and all other reports.
Selecting the Job ID
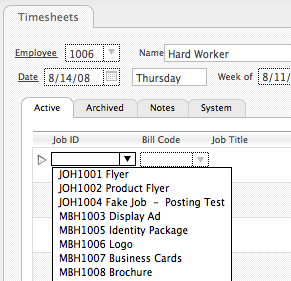
You select the Job ID via a pop-up menu when you enter data in Timesheets, Job Costs, Purchase Orders or Payables. Whenever you create a new estimate, invoice or purchase order from the Jobs table, the Job ID is automatically entered for you. The Job ID is the most important code in Studio Manager. It ties all the transactions together so that you can see and create reports that summarize by job.
Changing the Job Number
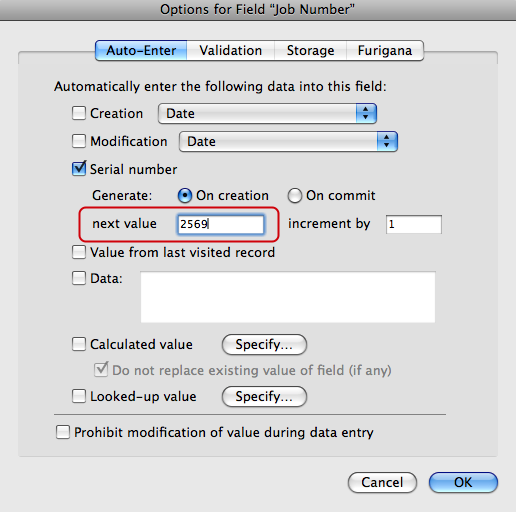
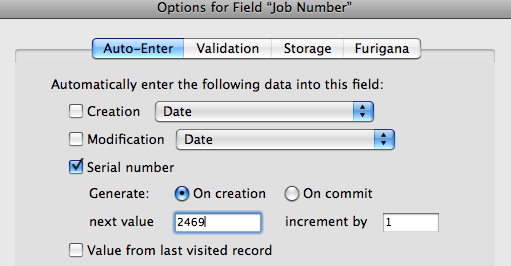
Use Entry Options (see Define Database in the Appendix) to change the Job Number field to start at a number of your choosing (you may already have a job numbering system and want to start where you’ve left off.) The Jobs table is provided with “1001†set as the first number.
To change the auto-enter serial number for Job Number, click on Define Database button on the System tab, Preferences subtab in Jobs. Scroll to and double-click on the Job Number field.
When the Entry Options dialog appears, choose Auto-Enter, make sure Serial number is chosen as well as On creation, then modify the next value. Enter the number that should appear on the next new job record you create.
If you do not want Studio Manager to auto-enter for you, uncheck the box to turn it off. Do this because you are choosing to number jobs by client or you intend to enter the job number manually.
Click OK and then click OK at the next window to indicate that you are done.
Different Format Needed for Job ID?
NOTE: if you prefer a different format for your Job IDs, other approaches can be implemented easily. Call or email us if you need assistance in making the necessary changes. See below for one option.
Option to Number your Jobs by Client
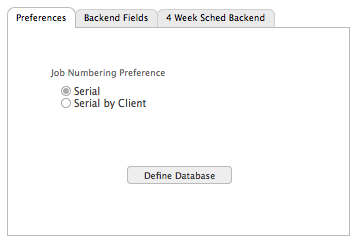
Select the job numbering preference on the System subtab on the main Jobs screen. When you create a new job for a particular client, the number part of the Job ID is set to the next higher number for that particular client.
So, for example, let’s say you’ve in the past had two jobs for a company with the code ABC. Let’s say we started numbering with 101, so 101 and 102 have already been used. When you create the third job for ABC, you automatically get 103. To use this option, select Serial by Client on the System screen in the Jobs table.
To use this option, you must also be sure to turn off auto-enter by serial number for the Job Number field in Entry Options (see Define Database).
CAUTION: Keep in mind that numbering jobs by client can make sense if that’s how you’ve worked prior to Studio Manager. The key is to choose a scheme before you begin. It is not a good idea to switch numbering schemes once you’ve got a numbering scheme already in place if you plan to mix your old jobs with your old job numbering scheme in with your new Studio Manager-created jobs.
Numbering Component Jobs
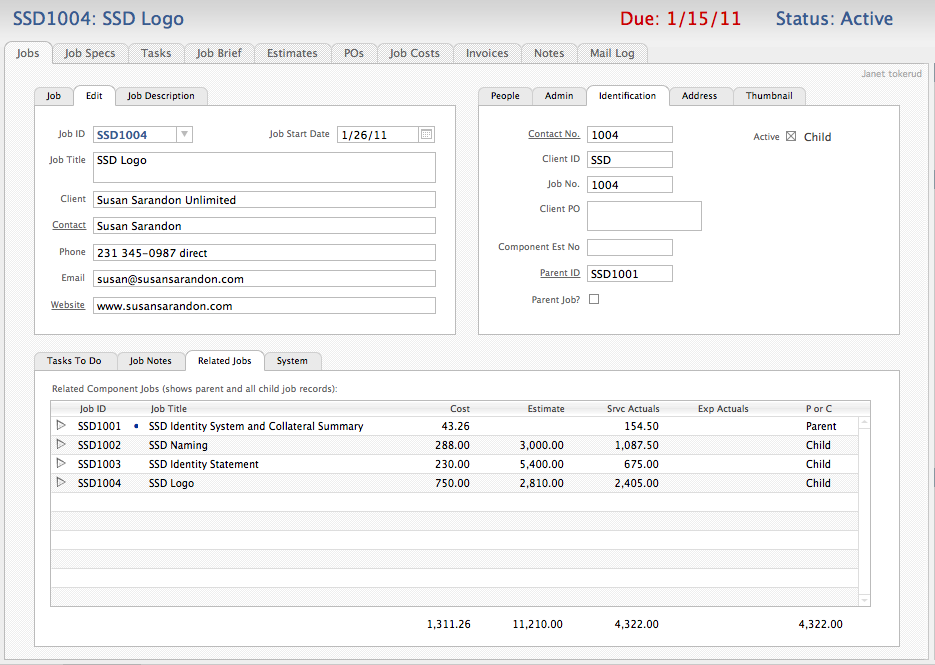
Component jobs consist of a parent job and one or more child jobs. Unless you as the user enters these jobs in consecutive order, they will not be numbered in order. It may be important to you to have the Job ID for each component be consecutive, although Studio Manager is smart enough to group all parts of a Component Job together on reports whether the Job IDs are consecutive or not.
To ensure consecutive numbering, we recommend that you create all jobs in a Component Job at the same time. Start with the parent job. Make sure to mark the Parent Job checkbox. Then create each child job, being sure to enter the parent Job ID in the appropriate field for each component.
Read the lesson on Component Jobs for a complete description of when you might choose this option and how to implement it.
Defining Job Specs
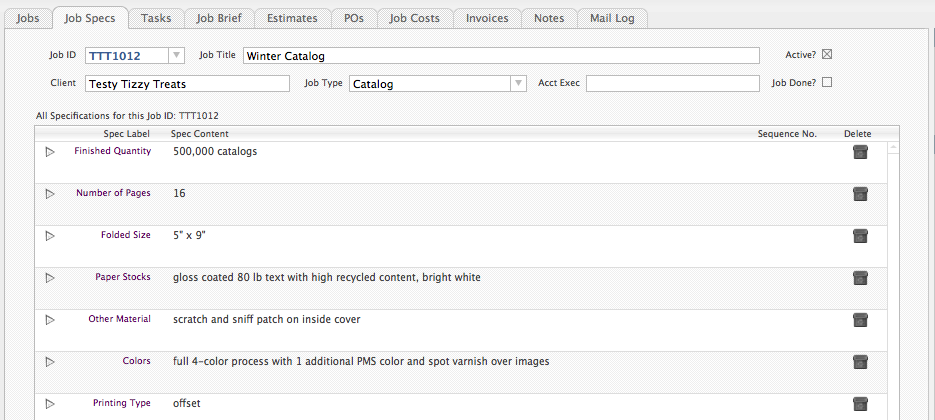
There is a Job Specs tab in the Jobs table so that you have a special place to store the mechanical, physical plane kind of details about a job. This makes it easier to enter enter job specifications in an organized manner. You have a whole screen on which to enter and edit specifications for each job. The definition of those specs is up to you.
Think of the most basic set of specifications for a job as the standard or generic specs. These are items that can be used for all jobs if all of your projects are similar or if they are a basic set of specs that you use frequently.
Changing Standard Job Specs
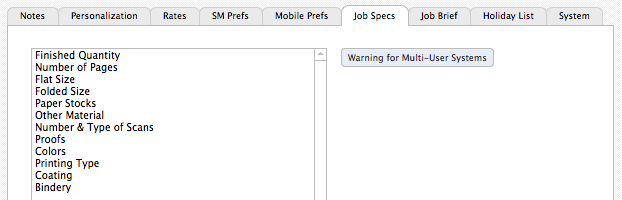
The list of these standard specs is stored in the Billing Codes table on the Job Specs tab. All you do is edit the sample set. You can make it shorter or longer. You can delete the sample data to make your own list.
We provide Studio Manager with a set of 12 pre-defined spec labels. We are talking “labels†here in the sense of descriptive tags or titles. With the help of your colleagues, we came up with the tasks that are frequently used by creative service professionals for print jobs.
CAUTION: To change the default list of specs, you’ll need to be using Studio Manager as a single user — not as a client. If you normally run FileMaker Server, shut it down. And then startup Studio Manager in FileMaker Pro.
Standard Specs or Spec Sets?
If you specialize in projects for printing, our categories may work for you. If you produce film, multi-media, web pages, radio spots, commercials, video or advertising (just to name a few), you will want to modify the standard specs list so that it is more useful to you.
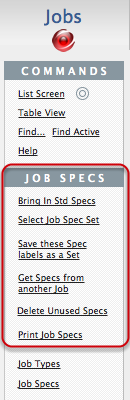
If your firm handles many types of jobs then enter the most common or generic specs here. From the Job Specs tab in Jobs, you can create and save any number of Spec Sets for any or all of the Job Types you handle. See the full manual for a lesson on how to do this.
Entering Current Jobs
Descriptions of each field on the main screen in Jobs can be found in the lesson on Jobs.
When you first start using Studio Manager, you will, more likely than not, want to enter in the jobs that you are currently working on. If you want to test Studio Manager before entrusting it with your active jobs, then enter some completed jobs for testing purposes.
Changing the Auto-Enter Sequential Numbering Option
If the current jobs that you enter use a numbering system with sequential numbers then you want to set the auto-enter option for the Job Number field to match your numbers. In Studio Manager the Job ID is a calculated combination of the Client ID and the Job Number.
If the first group of jobs you enter do not have sequential numbers, then you might not want the Job Number field to auto-number until you start entering new jobs. You can turn auto-numbering off temporarily.
Using the Define Database button in Jobs and following the steps in the Define Database lesson, open the Options dialog box for Job Number and either reset the number to match the first current job that you intend to enter. If you don’t want SM9 to enter the number for you, then uncheck this option. Clicking OK twice will take you back to the browse mode.
CAUTION: Remember that if you decide to number jobs by client the auto- enter serial number option should be permanently turned off.
Setting Up the Designers Value List
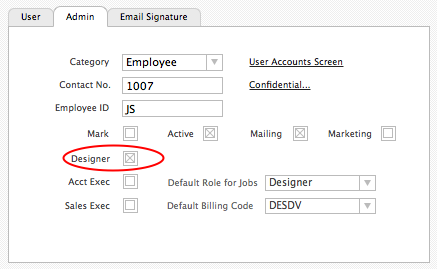
On the Employees tab in Contacts, on the Admin subtab, make sure that each employee who is a designer has the Designer checkbox checked. This will assure that they show up in the Designer value list on the Admin tab on the Jobs entry screen.
Setting Up the Acct Exec Value List
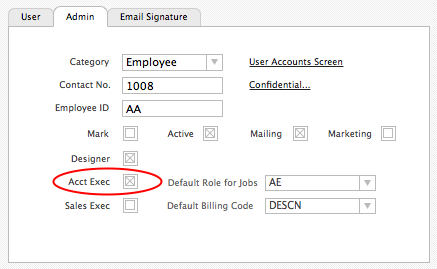
Also in Contacts, on the Employees tab, on the Admin subtab, mark the Acct Exec checkbox checkbox for each person on your staff who serves as an account executive, sales manager or similar. These are the folks that market your services and tend to your prospects and clients. Marking them in Contacts will assure that they show up in the Acct Exec value list in Jobs.
You can also assign an account exec to each client and then that same person will be assigned to any new jobs for that client account.
An employee may serve multiple roles. In this sample both Designer and Acct Exec are marked, meaning that this person may serve in either or both roles.

{ 0 comments… add one now }
You must log in to post a comment.