Setting Up Studio Manager 12 – Overview
Just like any other full-featured management program, Studio Manager requires some custom configuration so that it is personalized to your business and preferences. Unlike almost every other software product that you might use as a management tool, Studio Manager is also highly customizable. This makes Studio Manager somewhat unique in the vertical market category of Time & Expense Management databases.
Steps to Follow When Setting Up Studio Manager 12
We recommend that you use the following order in preparing Studio Manager for your use. By the time you are done, you will have entered all the people (Contacts), coding data and preferences (Billing Codes), active projects (Jobs, Estimates, Job Types, Specs and Tasks) and values necessary to prepare other modules for use (POs, Activities, etc).
Login Using the Master Password – 1

Welcome Screen – 2

The first thing you’ll see is the Welcome prompt. Click on the triangle icon (a downward pointing arrow of sorts) at the end of the empty field and select (click on) the only name there: “New Employee”. You will only need to do this once.
Because this is the first time you open Studio Manager, before you have entered any data, choose “New Employee”. Then click once anywhere else inside the window to see the Employee Number and the Continue button. Use your mouse to click the Continue button. There is no keyboard shortcut. Only employee names appear in the pop-down on the Welcome screen.
 Since you are the person setting up Studio Manager, you might make this your record, or perhaps the boss wants this number: figure that out before you begin. Record numbers 1001-1003 are reserved for Tokerud Consulting Group and are categorized as vendors. Records are numbered automatically and sequentially starting for you with Employee Number 1004.
Subsequently, after their names have been have been entered into Studio Manager, clicking the triangle arrow in this field will open a pop-down list showing the Names for all employees. Employees includes everyone you want to be able to use the file. You don’t have to enter everyone immediately.
Once an Account has been enabled for you (or anyone else), this screen is skipped and the user is taken directly to their Dashboard.
Enter Employees – 3
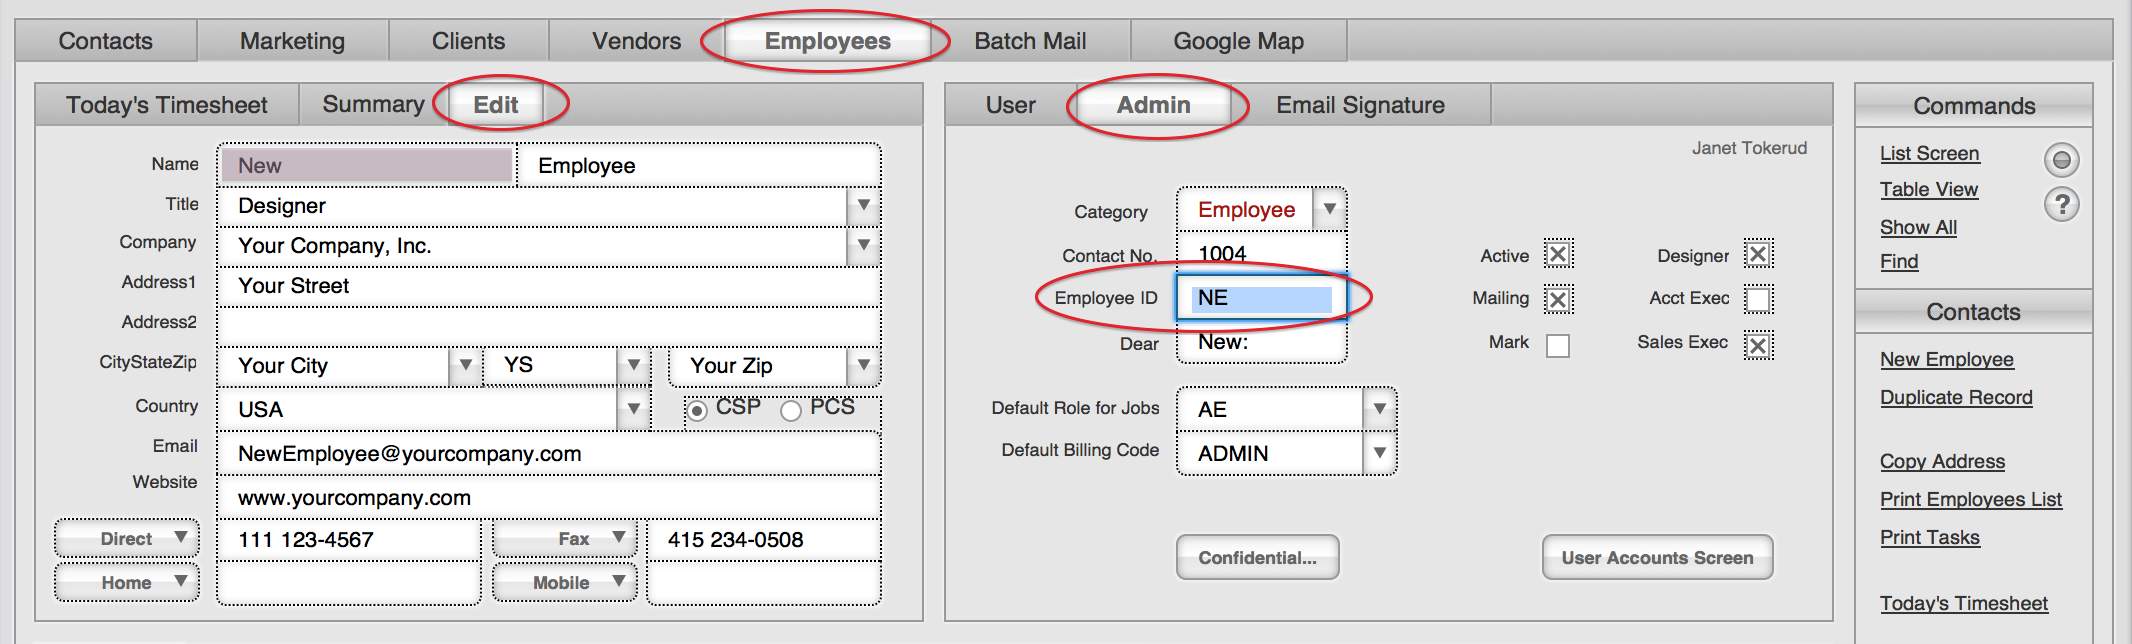 The first screen that you see when you open Studio Manager is the Dashboard view for the Employee whose name was chosen. The first time you open, the only record in Contacts is for New Employee.
Prepare to Enter Clients – 4
 Before you enter (or import) client records, you need to set the default rates that you charge for your work. The defaults for these are set in the Billing Codes table. Click on the More Places button at the bottom of the Places (aka navigation) menu in Contacts: up pops the More Places window. Click on Billing Codes to be transported there. If ever you open More Places by accident, click the Cancel button, at the very bottom, to close it.
Set Default Rates – 4a
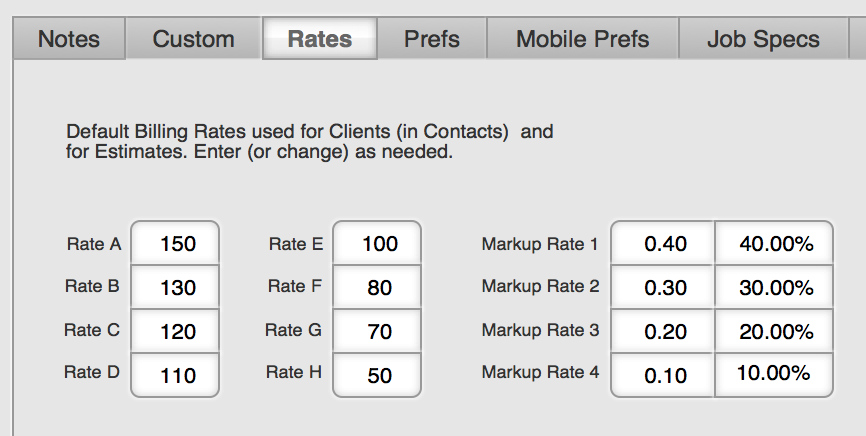
Click on the Rates subtab. Enter rates that correspond to your rate structure. You may enter up to 8 different rates, although most folks user fewer. Use Rate A as your highest rate and go down from there. Markup Rates apply to expenses only. You can have up to four markup rates. Only use as many as you need, starting with Markup Rate 1.
You will be returning to the Billing Codes table soon. For now, return to Contacts by choosing that from Places.
Enter Clients – 5
 Manual Data Entry:Â Click on the Clients tab, then the New Client button. Enter your currently active clients one at a time. Be sure to assign a unique 3-letter Client ID for each on the Admin tab. Modify the default hourly and markup rates if needed for any particular client. Print the Client list.
Import option: FileMaker can import data in many different file formats so you can likely save time by importing this data from other another source (like a contacts management file). Keep in mind, that if you do this, you will need to Set Default Rates for each of these client records. If you are savvy with FileMaker then you also know that you can use the Replace command to assist you in automating this process.
Define Billing Codes – 6
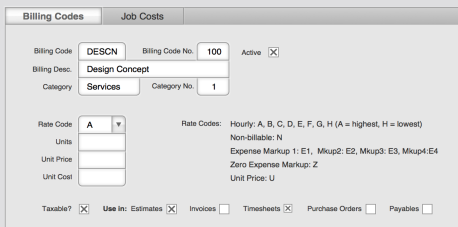 Choose More Places from the Places menu and then Billing Codes. Go through each record one at a time. Although you may want some of the sample codes, they are only suggestions. Edit, delete and create new billing code records as needed. Fill in the various fields that control how different billable categories will be handled in the system.
Personalize Studio Manager – 7
 This is also in the Billing Codes table. Enter your company name, phone, fax, email and website URL on the Custom tab. Finish by printing the Billing Codes List for your reference.
Enter Jobs – 8
 If you need your jobs to start with a particular number, reset the field definition for Job Number before you begin. Doing so requires Master level access and some skill with FileMaker. See the User Manual for instructions on how to Manage Field Definitions.
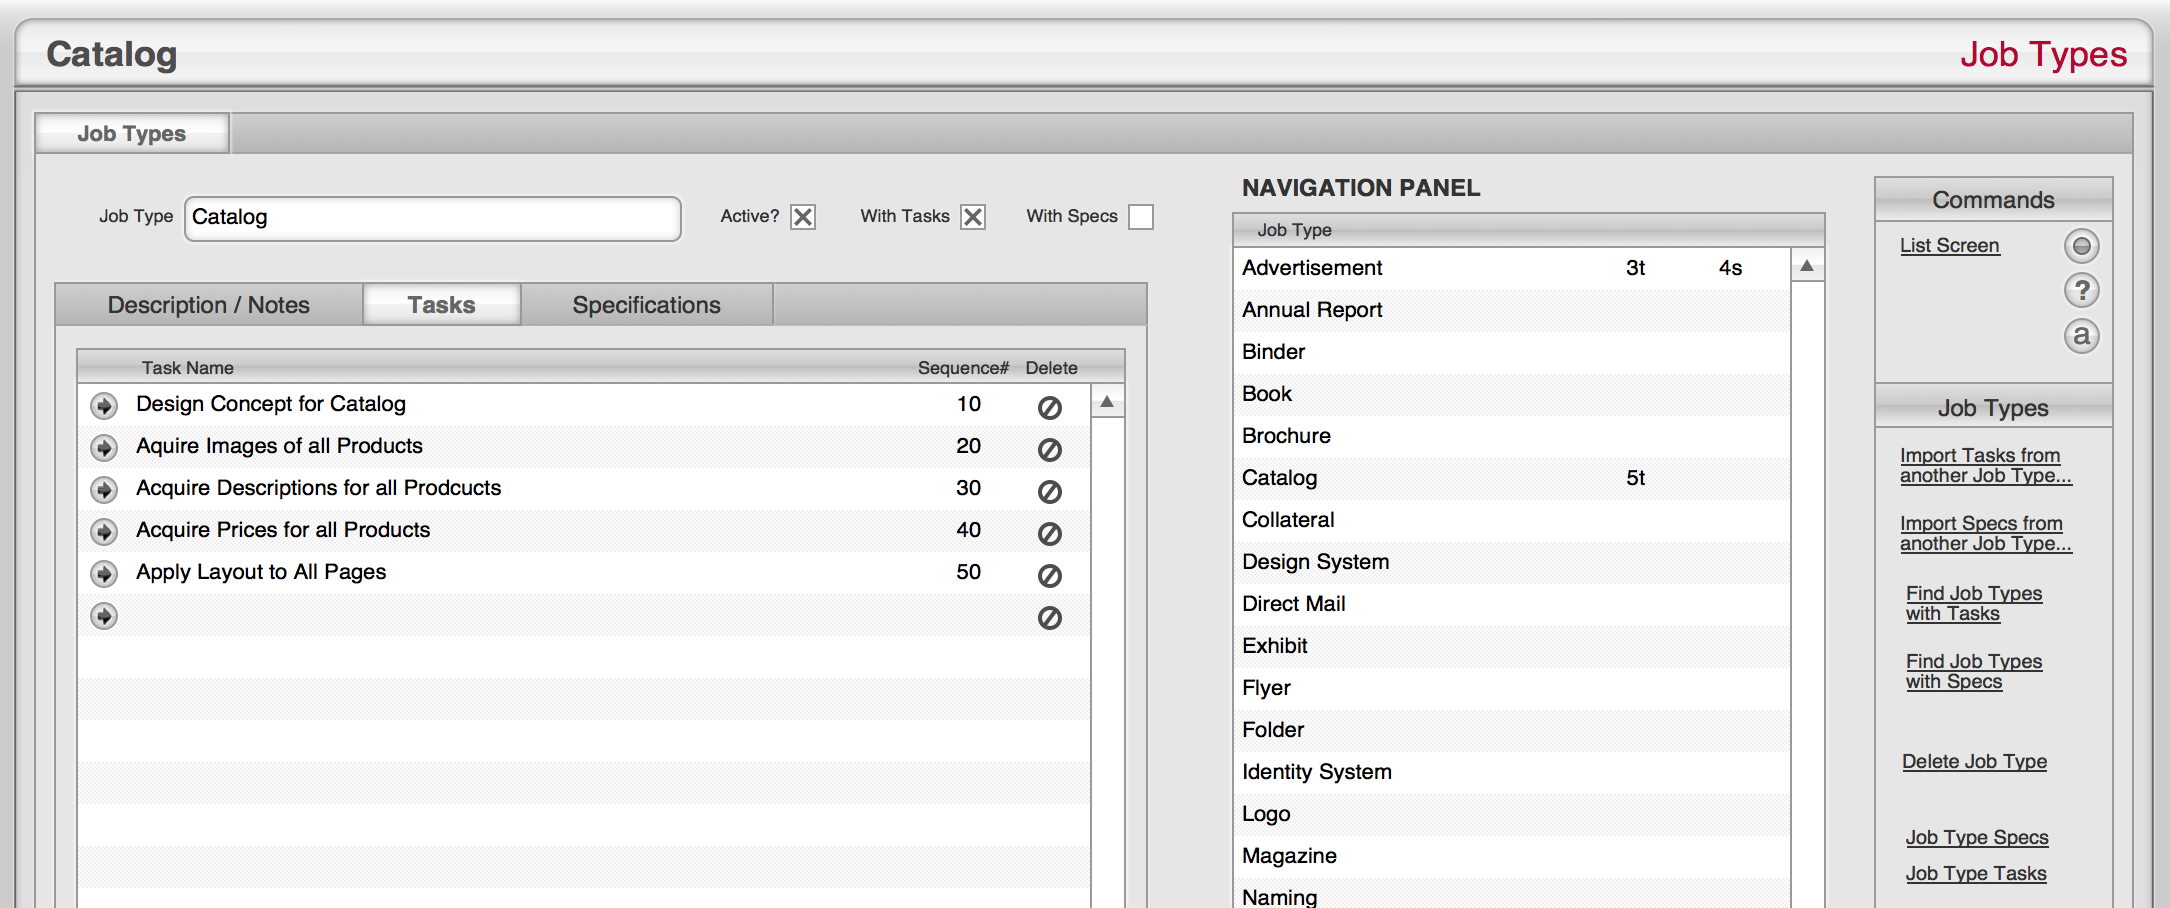
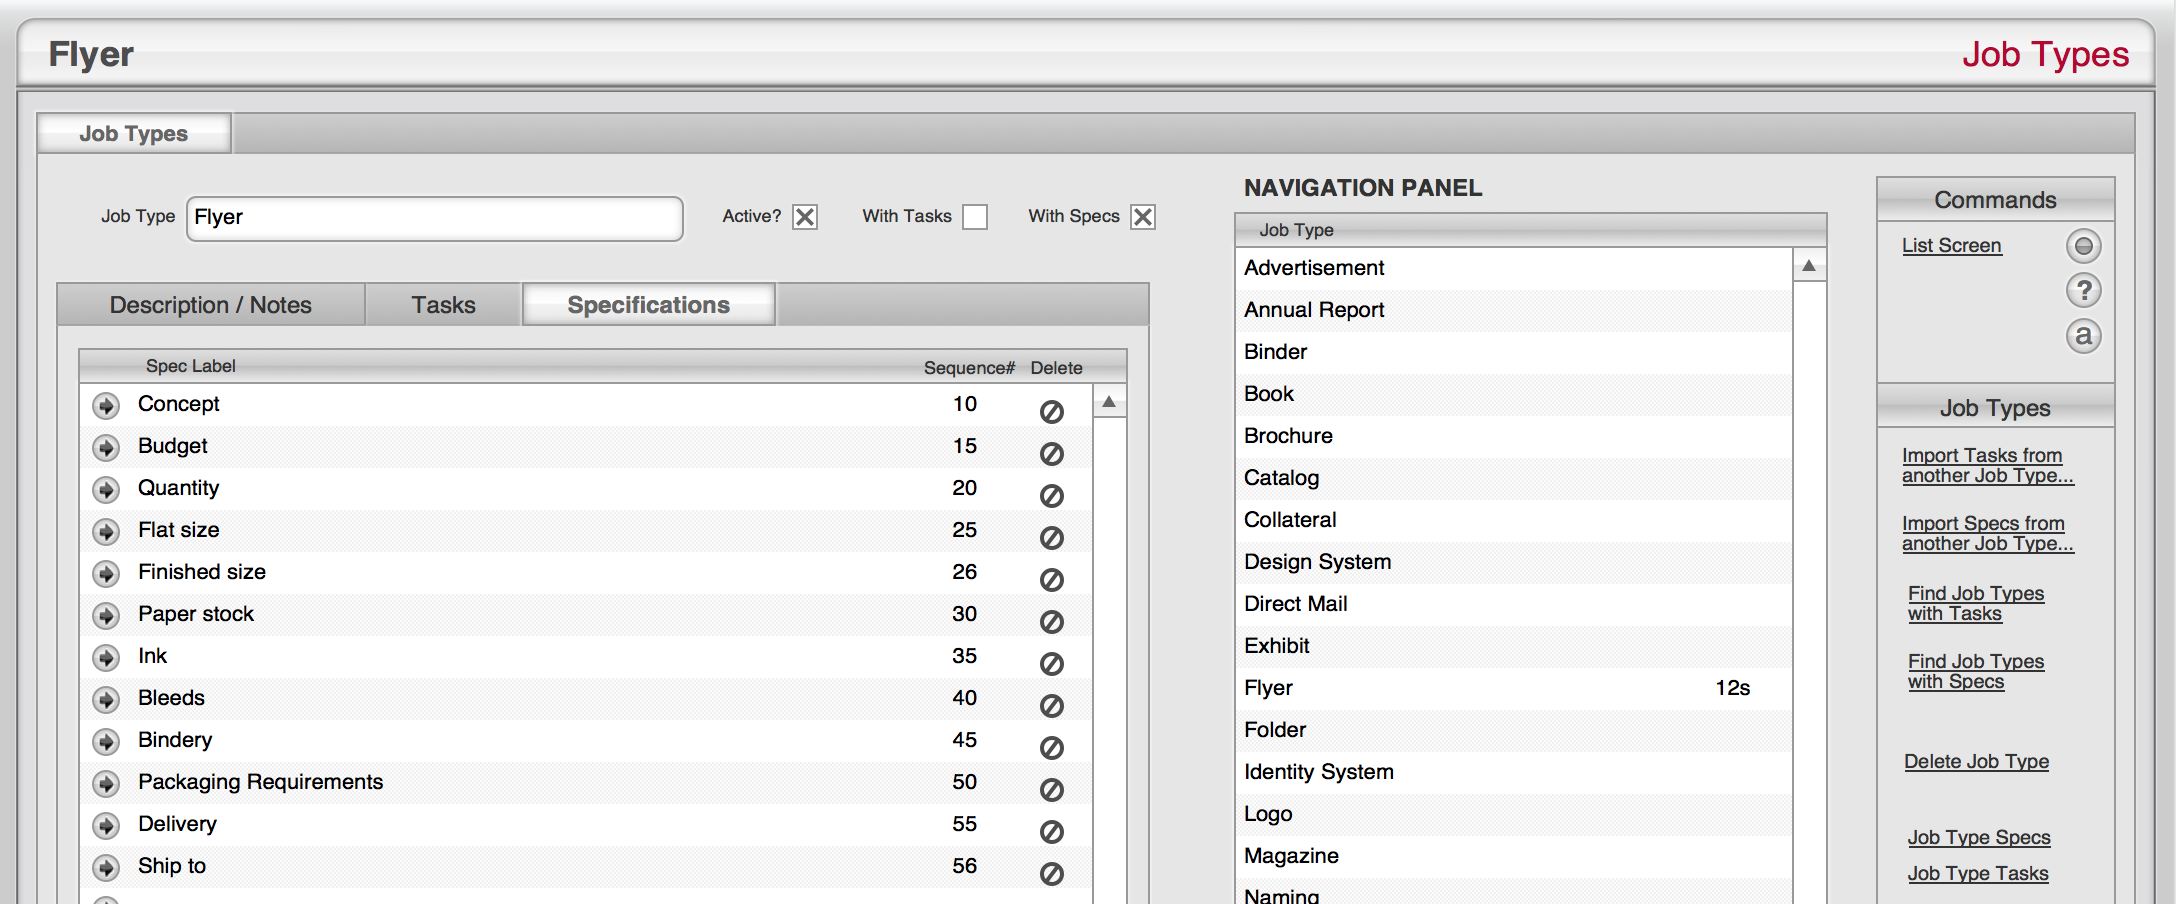
Edit Job Types

While you are at it, go to the Job Types table (look for the navigation button in More Places) and edit the table by adding, deleting and changing job type records to reflect the kinds of work you handle. The example above shows the list screen.
Enter Tasks & Specs
 When you are ready, enter standard tasks for each job type (see above) and job specifications categories (see below) again, for each major type of job you deal with.
 This small amount of extra set-up work up front will pay you back time and time again down the line when all you do is select the job type and the tasks and specs are automatically entered. These can then be edited, deleted or expanded upon.
Enter Vendors & Prospects

Prepare for Estimating

If you want to do estimating in Studio Manager, then a little upfront prep will help. To easily mark the appropriate codes, open Billing Codes again (More Places) and choose the List Screen. Mark each Billing Code record that should appear on the estimate by clicking the Estimates checkbox. On the Entry Screen (see above) also make sure you have entered an Average Cost per Hour on the  Prefs tab.
Prepare for POs
 Prepare to issue purchase orders by marking the billing code records that you want to use for POs. You can do this one at a time on each record, or save yourself some time by using the list screen.
Format Layouts
 Customize the Estimate, Purchase Order and Invoice layouts to fit your letterhead and to use your preferred font. You can add your company logo and address to the layout if you wish by choosing Picture… from the Insert menu. You may also type in layout text if the quality is acceptable to you.
You may also wish to change the report typeface from Helvetica to a font of your choice on each report layout. Changing the font will likely require a little extra layout work to realign fields with labels, but your design staff should be able to do this quickly and easily with just a glance at the FileMaker Pro online help or a FileMaker 12 book, if they aren’t already knowledgeable.
Test Your Studio Manager Data
 Do some testing to make sure you understand how to enter job cost data. Select a job or make a fake job, create an estimate for it (and transfer that to Job Costs), then enter some time records, both via Timesheets and directly into Job Costs. Also enter some expenses.
Then run some reports from Job Costs (you can choose them one at a time from the menu on the Job Costs entry screen). Compare these to your own figures. The arithmetic calculations performed by Studio Manager are very reliable because of FileMaker. If your results are different, check to be sure you are entering the correct codes.
Â
{ 0 comments… add one now }
You must log in to post a comment.